Cloud Security with AWS IAM
Let’s use IAM to control access to our AWS resources.

Introduction
AWS Identity and Access Management (IAM) helps to control who is authenticated (signed in) and authorized (has permissions) to use your account’s resources.
AWS IAM allows you to manage access to resources through several key components:
- Users: Individuals or applications that will get access to AWS resources, each with unique credentials, such as a username, password, or access keys.
- Groups: Collections of users with similar access needs, allowing permissions to be assigned collectively rather than individually.
- Policies: Rule for who can do what with your AWS resources. It’s all about giving permissions to IAM users, groups, or roles, saying what they can or can’t do on certain resources, and when those rules kick in.
- Permissions Boundaries: Policies that set the upper limit of permissions an IAM entity (like a user or role) can have, enhancing security by preventing over-permissioning.
Services Used:
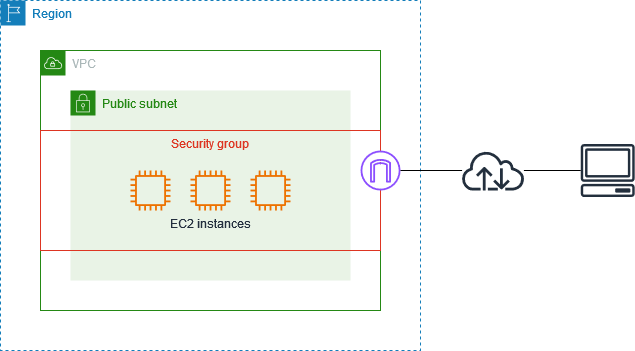
- 💻 EC2 instances
- 📏 IAM Policies
- 👩👩👧👧 IAM Users and User Groups
- 🔖 AWS Account Alias

Step #1. Launch EC2 Instances with Tags
We will launch 2 EC2 Instances ( Production and Development ) to test the effectiveness of the permission settings in AWS IAM.
Launching an EC2 Instance with tags :
- In your EC2 console, choose
Launch instancesIn Name enter the valuenextwork-production-athira. ChooseAdd additional tagswhich is right next to your Name field. ChooseAdd new tagFor the next tag, use this information Key :EnvValue :production - Repeat the same flow, but this time using these tags: Name:
nextwork-development-athiraEnv:development

Tags are like labels you can attach to AWS resources for organization. This tagging helps us with identifying all resources with the same tag at once.
Step #2 Creating IAM Policy
- Head to your
IAMconsole. choose Policies. ChooseCreate policy.Switch your Policy editor tab to JSON.
{
  "Version": "2012-10-17",
  "Statement": [
    {
      "Effect": "Allow",
      "Action": "ec2:*",
      "Resource": "*",
      "Condition": {
        "StringEquals": {
          "ec2:ResourceTag/Env": "development"
        }
      }
    },
    {
      "Effect": "Allow",
      "Action": "ec2:Describe*",
      "Resource": "*"
    },
    {
      "Effect": "Deny",
      "Action": [
        "ec2:DeleteTags",
        "ec2:CreateTags"
      ],
      "Resource": "*"
    }
  ]
}- Select
NextFill in your policy’s details: - Name:
NextWorkDevEnvironmentPolicyDescription:IAM Policy for NextWorks development environment. - Choose
Create policy
Step #3 .Create an AWS Account Alias
- Head to your IAM dashboard. In the right-hand side of the dashboard, choose
Createunder Account Alias. In the Preferred alias field, enternextwork-alias-athira. ChooseCreate alias
Step #4 :Create IAM Users and User Groups
- Choose
User groupsin your left-hand navigation panel. ChooseCreate group. To set up your user group: Name:nextwork-dev-groupAttach permission policies:NextWorkDevEnvironmentPolicy. - Now let’s add Users to user group. Choose
Usersfrom the left-hand navigation panel. ChooseCreate user.Let’s set up this user! Under User name, enterdev-athiraTick the checkbox forProvide user access to the AWS Management ConsoleSelectNext. - To set permissions for your user, we’ll simply add it to the user group you’ve created. Select the checkbox next to next to
nextwork-dev-group.SelectNextSelectCreate user. - Now you will see some specific sign-in details for your new user. Copy the
Console sign-in URLDo not close this tab!. Open a new incognito window on your browser.
Step #5 Test your user’s access
- Log In as IAM user : Using the User name and Console password given in your IAM tab, let’s log in!
- Stop Production Instance : Select your
productioninstance, and in theActionsdropdown, selectManage instance stateSelect theStop option, thenChange stateSelectStop.This will fail because we’re not authorized! - Stop Development Instance : Now lets try to stop the
developmentinstance and will succeed, demonstrating the policy’s effectiveness.
Step #6 IAM Policy Simulator
The IAM Policy Simulator lets you test and validate your policies without affecting your actual AWS resources
- Head back to your main AWS account (not the dev user!). In your IAM dashboard, look for the Policy Simulator link under the Tools panel. Select your dev user group.
- Under the
Select servicedrop-down, selectEC2Under theSelect actionsdrop-down, selectDeleteTagsandStopInstancesSelectRun Simulation - You’ll see that both are denied. ❌
- Expand the toggle for DeleteTags, and select
Show statementyou even get to see exactly which statement inNextWorkDevEnvironmentPolicyis blocking your user from deleting tags. Pretty handy!

- Now, expand the
StopInstancestoggle, and in the Instance field, adddevelopmentto indicate that you want to run the simulation for the instances with that tag.SelectRun simulationagain.

- Now your Policy Simulator tells you that access is granted after all.

Finally, just tested your custom IAM policy without affecting your environment.
Conclusion
AWS IAM is a powerful tool for managing access to cloud resources, and implementing best practices is crucial to maintaining a secure environment.
Originally published at https://www.linkedin.com.